一、关于Spring Cloud Sleuth
随着业务的发展, 系统规模也会变得越来越大, 各微服务间的调用关系也变得越来越错综复杂。 通常 一 个由客户端发起的请求在后端系统中会经过多个不同的微服务调用来协同产生最后的请求结果, 在复杂的微服务架构系统中,几乎每一个前端请求都会形成一条复杂的分布式服务调用链路,在每条链路中任何一个依赖服务出现延迟过高或错误的时候都有可能引起请求最后的失败。这时候,对于每个请求,全链路调用的跟踪就变得越来越重要,通过实现对请求调用的跟踪可以帮助我们快速发现错误根源以及监控分析每条请求链路上的性能瓶颈等。针对上面所述的分布式服务跟踪问题, Spring Cloud Sleuth 提供了一套完整的解决方案
本文代码仓库地址:https://github.com/lazyrabb1t/rabb-springcloud-demo
二、术语
Spring Cloud Sleuth采用的是Google的开源项目Dapper的专业术语。
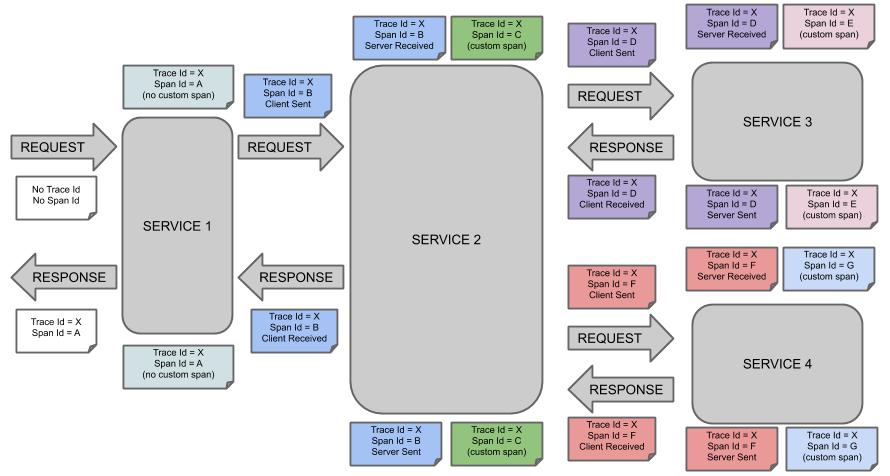
Span:基本工作单元,发送一个远程调度任务就会产生一个Span
Trace:一系列Span形成的一个树状结构。请求一个微服务系统的API接口,这个API接口,需要调用多个微服务,调用每个微服务都会产生一个新的Span,所有由这个请求产生的Span组成了这个Trace。
Annotation/Event:用来记录事件
- cs - Client Sent - 客户端发送一个请求,这个注解描述了这个Span的开始。
- sr - Server Received - 服务端获得请求,将其减去cs时间戳便可得到网络传输的时间。
- ss - Server Sent – 表示请求处理完成(当响应已发送回客户端时)。从这个时间戳中减去sr时间戳,就可以得到服务器端处理请求所需的时间。
- cr - Client Received 表示Span的结束,cr的时间戳减去cs时间戳便可以得到整个请求所消耗的时间。
三、关于zipkin
Zipkin 是 Twitter 公司开发贡献的一款开源的分布式实时数据追踪系统(Distributed Tracking System),基于 Google Dapper 的论文设计而来,其主要功能是聚集各个异构系统的实时监控数据。
它可以收集各个服务器上请求链路的跟踪数据,并通过 Rest API 接口来辅助我们查询跟踪数据,实现对分布式系统的实时监控,及时发现系统中出现的延迟升高问题并找出系统性能瓶颈的根源。除了面向开发的 API 接口之外,它还提供了方便的 UI 组件,每个服务向 Zipkin 报告计时数据,Zipkin 会根据调用关系生成依赖关系图,帮助我们直观的搜索跟踪信息和分析请求链路明细。Zipkin 提供了可插拔数据存储方式:In-Memory、MySql、Cassandra 以及 Elasticsearch。
分布式跟踪系统还有其他比较成熟的实现,例如:Naver 的 PinPoint、Apache 的 HTrace、阿里的鹰眼 Tracing、京东的 Hydra、新浪的 Watchman,美团点评的 CAT,Apache 的 SkyWalking 等。
共有四个组件构成了 Zipkin:
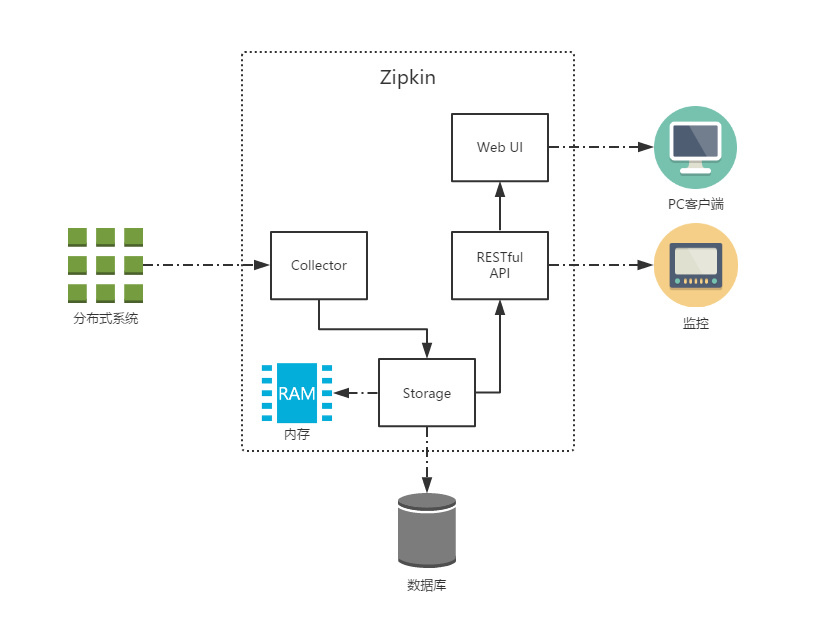
- Collector:收集器组件,处理从外部系统发送过来的跟踪信息,将这些信息转换为 Zipkin 内部处理的 Span 格式,以支持后续的存储、分析、展示等功能。
- Storage:存储组件,处理收集器接收到的跟踪信息,默认将信息存储在内存中,可以修改存储策略使用其他存储组件,支持 MySQL,Elasticsearch 等。
- Web UI:UI 组件,基于 API 组件实现的上层应用,提供 Web 页面,用来展示 Zipkin 中的调用链和系统依赖关系等。
- RESTful API:API 组件,为 Web 界面提供查询存储中数据的接口。
官网地址:https://zipkin.io/
四、使用
1、引入依赖
添加以下依赖,这里我在eureka-service和eureka-provider模块引入依赖
...
<dependency>
    <groupId>org.springframework.cloud</groupId>
    <artifactId>spring-cloud-starter-sleuth</artifactId>
</dependency>
<dependency>
    <groupId>org.springframework.cloud</groupId>
    <artifactId>spring-cloud-sleuth-zipkin</artifactId>
</dependency>
<!--mysql监控依赖-->
<dependency>
    <groupId>io.zipkin.brave</groupId>
    <artifactId>brave-instrumentation-mysql8</artifactId>
    <version>5.10.1</version>
</dependency>
...
2、启动zipkin服务端
zipkin下载地址:https://zipkin.io/pages/quickstart.html
java -jar ./zipkin-server-2.23.2-exec.jar
3、配置
配置zipkin服务端地址,若在同一台机器可不进行配置
...
spring:
  application:
    name: rabb-eureka-consumer
  zipkin:
    base-url: https://192.168.99.100:9411/
...
4、测试
启动eureka-server、provider模块,调用其接口
5、访问zipkin界面
浏览器访问http://localhost:9411/zipkin/,即可看到链路信息

五、源码分析
1、自动配置类
spring-cloud-sleuth-autoconfigure-3.0.1.jar
spring.factories
# Auto Configuration
org.springframework.boot.autoconfigure.EnableAutoConfiguration=\

...

org.springframework.cloud.sleuth.autoconfig.instrument.web.TraceWebAutoConfiguration,\
org.springframework.cloud.sleuth.autoconfig.instrument.web.client.TraceWebClientAutoConfiguration,\
org.springframework.cloud.sleuth.autoconfig.instrument.web.client.feign.TraceFeignClientAutoConfiguration,\
org.springframework.cloud.sleuth.autoconfig.instrument.web.client.TraceWebAsyncClientAutoConfiguration,\

...

# Environment Post Processor
org.springframework.boot.env.EnvironmentPostProcessor=\
org.springframework.cloud.sleuth.autoconfig.TraceEnvironmentPostProcessor,\

...
2、日志输出链路信息
首先看下TraceEnvironmentPostProcessor类,可以看到在这个类中覆盖了logging.pattern.level配置,因此在集成了sleuth依赖后日志输出会存在应用名称以及traceId和spanId
class TraceEnvironmentPostProcessor implements EnvironmentPostProcessor {
    private static final String PROPERTY_SOURCE_NAME = "defaultProperties";

    TraceEnvironmentPostProcessor() {
    }

    public void postProcessEnvironment(ConfigurableEnvironment environment, SpringApplication application) {
        Map<String, Object> map = new HashMap();
        if (Boolean.parseBoolean(environment.getProperty("spring.sleuth.enabled", "true"))) {
            map.put("logging.pattern.level", "%5p [${spring.zipkin.service.name:${spring.application.name:}},%X{traceId:-},%X{spanId:-}]");
        }

        this.addOrReplace(environment.getPropertySources(), map);
    }

    ...
}
3、记录trace以及span信息
在TraceWebServletConfiguration类中中注册了一个过滤器TracingFilter
@Configuration(
    proxyBeanMethods = false
)
@ConditionalOnSleuthWeb
@ConditionalOnWebApplication(
    type = Type.SERVLET
)
@ConditionalOnClass({HandlerInterceptorAdapter.class})
@Import({SpanCustomizingAsyncHandlerInterceptor.class})
class TraceWebServletConfiguration {
    TraceWebServletConfiguration() {
    }

    @Configuration(
        proxyBeanMethods = false
    )
    @ConditionalOnProperty(
        value = {"spring.sleuth.web.servlet.enabled"},
        matchIfMissing = true
    )
    static class ServletConfiguration {
        ServletConfiguration() {
        }

        @Bean
        TraceWebAspect traceWebAspect(Tracer tracer, CurrentTraceContext currentTraceContext, SpanNamer spanNamer) {
            return new TraceWebAspect(tracer, currentTraceContext, spanNamer);
        }

        @Bean
        FilterRegistrationBean traceWebFilter(BeanFactory beanFactory, SleuthWebProperties webProperties) {
            FilterRegistrationBean filterRegistrationBean = new FilterRegistrationBean(new LazyTracingFilter(beanFactory), new ServletRegistrationBean[0]);
            filterRegistrationBean.setDispatcherTypes(DispatcherType.ASYNC, new DispatcherType[]{DispatcherType.ERROR, DispatcherType.FORWARD, DispatcherType.INCLUDE, DispatcherType.REQUEST});
            filterRegistrationBean.setOrder(webProperties.getFilterOrder());
            return filterRegistrationBean;
        }

        @Bean
        @ConditionalOnMissingBean
        TracingFilter tracingFilter(CurrentTraceContext currentTraceContext, HttpServerHandler httpServerHandler) {
            return TracingFilter.create(currentTraceContext, httpServerHandler);
        }

        @Configuration(
            proxyBeanMethods = false
        )
        @ConditionalOnClass({WebMvcConfigurer.class})
        @Import({TraceWebMvcConfigurer.class})
        protected static class TraceWebMvcAutoConfiguration {
            protected TraceWebMvcAutoConfiguration() {
            }
        }
    }
}
过滤器中会添加trace以及span信息,并将这些信息保存到上下文中
public final class TracingFilter implements Filter {
    final ServletRuntime servlet = ServletRuntime.get();
    final CurrentTraceContext currentTraceContext;
    final HttpServerHandler handler;

    public static TracingFilter create(CurrentTraceContext currentTraceContext, HttpServerHandler httpServerHandler) {
        return new TracingFilter(currentTraceContext, httpServerHandler);
    }

    TracingFilter(CurrentTraceContext currentTraceContext, HttpServerHandler httpServerHandler) {
        this.currentTraceContext = currentTraceContext;
        this.handler = httpServerHandler;
    }

    public void doFilter(ServletRequest request, ServletResponse response, FilterChain chain) throws IOException, ServletException {
        HttpServletRequest req = (HttpServletRequest)request;
        HttpServletResponse res = this.servlet.httpServletResponse(response);
        TraceContext context = (TraceContext)request.getAttribute(TraceContext.class.getName());
        if (context != null) {
            Scope scope = this.currentTraceContext.maybeScope(context);

            try {
                chain.doFilter(request, response);
            } finally {
                scope.close();
            }

        } else {
            // 从Http Request的Header里获取Span数据,如果Header中存在X-B3-TraceId,X-B3-SpanId,X-B3-ParentSpanId属性,
            // 就说明调用链前一个节点已经生成Span,并传递下来,这时可以直接使用这些Span数据。否则,创建一个新的Span。
            Span span = this.handler.handleReceive(new HttpServletRequestWrapper(req));
            // 记录一些Span的属性
            request.setAttribute(SpanCustomizer.class.getName(), span);
            request.setAttribute(TraceContext.class.getName(), span.context());
            TracingFilter.SendHandled sendHandled = new TracingFilter.SendHandled();
            request.setAttribute(TracingFilter.SendHandled.class.getName(), sendHandled);
            Throwable error = null;
            // 保存当前的Span信息到上下文中
            Scope scope = this.currentTraceContext.newScope(span.context());
            boolean var17 = false;

            try {
                var17 = true;
                chain.doFilter(req, res);
                var17 = false;
            } catch (Throwable var22) {
                error = var22;
                throw var22;
            } finally {
                if (var17) {
                    if (this.servlet.isAsync(req)) {
                        this.servlet.handleAsync(this.handler, req, res, span);
                    } else if (sendHandled.compareAndSet(false, true)) {
                        HttpServerResponse responseWrapper = HttpServletResponseWrapper.create(req, res, error);
                        this.handler.handleSend(responseWrapper, span);
                    }

                    scope.close();
                }
            }

            if (this.servlet.isAsync(req)) {
                this.servlet.handleAsync(this.handler, req, res, span);
            } else if (sendHandled.compareAndSet(false, true)) {
                HttpServerResponse responseWrapper = HttpServletResponseWrapper.create(req, res, error);
                this.handler.handleSend(responseWrapper, span);
            }

            scope.close();
        }
    }

    public void destroy() {
    }

    public void init(FilterConfig filterConfig) {
    }

    static final class SendHandled extends AtomicBoolean {
        SendHandled() {
        }
    }
}